This post is still being written, but feel free to go ahead and read through what is here!
In this post, I'll show you how to develop and deploy a simple website in three steps.
We'll use my website, thomasneff.com, as an example along the way.
Please note that these steps are written for Windows users.
If you're a seasoned developer, you can probably skip most of this section. But if your new to development, let's get you set up.
First, you will want to open (or download) an Integrated Development Environment (IDE). This is a fancy name for the software that will let you edit your code. Many developers use Visual Studio Code, and it's my tool of choice as well.
https://code.visualstudio.com/
Next, install Git. Git will help us with version control, making it easy to push and pull changes from our command line.
Once you have everything installed, it's time to set up a code repository. For this example, we'll be using GitHub. Navigate to their website and set up an account, if you don't already have one. Then, follow the on-screen instructions to create a new repository.
You can look at my repository for this website as an example.
We want to make changes to the code in our online repository (GitHub) using our local machine's IDE (Visual Studio Code). To do that, we need to clone the repository to our local machine.
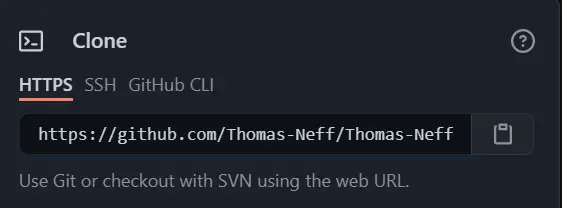
Navigate to your repository in GitHub. Here is my repository for this website again as an example. Click on the green button that says "Code". It should look similar to the button below.
Copy the HTTPS link that appears. It should look similar to the screenshot below, but with your repository information.
Open Visual Studio Code. You should be greeted with a welcome screen that has a link to clone a repository.
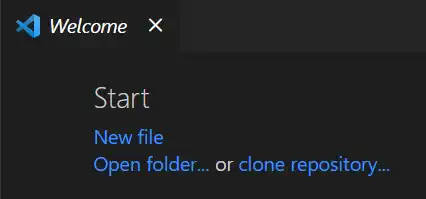
Click on clone repository... and paste the link from GitHub. You will be prompted to save the repository somewhere on your PC.
Our development environment is now set up! Here's a quick summary of everything we did:
We made it to the fun part! Time to start developing our website.
Within Visual Studio Code, make sure you are in the folder where you
cloned your repository. In the file explorer on the left-hand side,
click on the symbol:
 to add a file and name it index.html. This will be the homepage for
your website. Copy and paste the following code into your index.html
and hit save.
to add a file and name it index.html. This will be the homepage for
your website. Copy and paste the following code into your index.html
and hit save.
I included some additional comments to help explain the HTML for beginners.
Note that I included Bootstrap, which is a responsive framework that will make our website beautiful on mobile phones as well as desktop browsers. I also included popper.js and jQuery JavaScript libraries, which are both necessary for Bootstrap to function correctly (though Bootstrap 5 has removed jQuery as a requirement).
In order to view your code in a browser, we will add an extension
called Live Server. Click on the symbol:
 on the left-hand menu bar in Visual Studio Code to view extensions.
Search for Live Server, verify the extension is made by "Ritwick
Dey" (it should be the first result) and click install. After it's
done installing, you may need to restart Visual Studio Code.
on the left-hand menu bar in Visual Studio Code to view extensions.
Search for Live Server, verify the extension is made by "Ritwick
Dey" (it should be the first result) and click install. After it's
done installing, you may need to restart Visual Studio Code.
Open index.html within Visual Studio Code, and click on the button:
 in the bottom right-hand tool bar. Your browser will open and you
should see a rendering of your local code.
in the bottom right-hand tool bar. Your browser will open and you
should see a rendering of your local code.

Bootstrap uses a grid system to make your site responsive on any screen size. Each row is divided into 12 units.
Below is an example of a row with three equal width columns.
First of three equal width columns
[col-4]
Second of three equal width columns
[col-4]
Third of three equal width columns
[col-4]
Below is an example of a row with three columns of variable width.
Column with a width of 3 units
[col-3]
Column with a width of 6 units
[col-6]
Column with a width of 3 units
[col-3]
Below is an example of a row with three columns with medium breakpoints. Try viewing this on your mobile, or using your browser's "inspect" tool to see the mobile view. You will see that the columns are stacked on top of each other.
First of three equal width columns with medium breakpoint
[col-md-4]
Second of three equal width columns with medium breakpoint
[col-md-4]
Third of three equal width columns with medium breakpoint
[col-md-4]
This was a VERY brief overview, so make sure you check out the Bootstrap documentation at https://getbootstrap.com/docs/4.0/layout/grid/ for more details on implementation.
Using CSS allows you to manage styling across your entire website with ease. To start working with CSS, add a new file within your Visual Studio Code File Explorer and name it styles.css. Copy and paste the following code into your styles.css and hit save.
In this example, we added a salmon-colored background that we intend to use for our headers. Next, we need to link the styles.css sheet to our index.html page. To accomplish that, copy and paste the following code within the head tag on your index.html page.
Also, add your header-background class to your h1 tag, similar to the following code snippet.
You should see a salmon-colored background behind your header when you render the page.

Feel free to use styles.css to add in any other custom colors, fonts, or additional styling that you want, or take advantage of the built in classes that bootstrap provides.
Note - we are not creating a "dynamic website" here. That would require a backend activity (server side). We are adding in dynamic features, in the sense that our static web page's content and user experience can change as users interact with it.
TBD
TBD
Note - if you are working with other developers, you should learn about branches. It is not a best practice to work out of the main branch (which is where we're working); however - if it's only you working on the site, you may find it easier.
TBD
TBD - custom resume content, adding in the blog for thomasneff.com, blue styling with CSS, adding in URL slugs with JavaScript
We now have the beginnings of a beautiful website. Here is a summary of everything we did:
It's time to make our website available to the masses. There are lots of ways to deploy a static website, but I'm going to recommend one that my friend Matt Rodgers from matthewdavidrodgers.com turned me on to: Netlify.
Netlify is so easy that when I had a time sensitive emergency to deploy a crude JavaScript pickle mass calculator. I turned to Netlify. Even though it was my first time using the tool and I had to go through the sign up process, I had a working, live pickle mass calculator deployed in under 10 minutes.
Here are your Netlify instructions:
Netlify will auto-generate a domain name for you, which you can change later. The initial deployment will take a few minutes. In the future, every time you make changes to your main branch in GitHub, Netlify will automatically deploy in a matter of seconds.
If you followed along, you now have a live, functioning website for the world to enjoy. If you are just a reader, hopefully you have a better understanding of how I developed and deployed thomasneff.com.
Thanks for reading!
Return to Blog Return Home